Deploy an image from a private AWS Elastic Container Registry (ECR)
- Skill required
- DevOps Proficiency
At some point a simple subscription membership site is not enough. If you are deploying custom business logic for your application as a server-side compoment, you will have to:
- Build a Docker image for your application
- Upload the image to a Docker registry
- Deploy an image to a DjaoApp website
In this tutorial, we will walk through the steps of building a Docker image, uploading it to an AWS ECR private registry specifically and deploying from that ECR registry to a DjaoApp Website.
Build a Docker image for your application
The requirements to deploy a Docker container are minimal. We need to:
- Run the Webserver on port 80 in the container
- Write the logs on stdout and stderr
Let's look at a Dockerfile example
...
# Bundle app source
COPY . /app/reps/app_name
WORKDIR /app/reps/app_name
RUN /app/bin/pip install -r requirements.txt

# Expose application http port
Expose 80

# Run
CMD ["/app/bin/gunicorn", "-c", "/etc/djaopsp/gunicorn.conf", "djaopsp.wsgi"]
We have a Dockerfile, so let's build the image and run it locally to verify it responds to HTTP requests as expected.
$ docker build -t app_name .
Successfully built IMAGE_ID
$ docker run -d -p 8000:80 -t app_name
$ wget http://localhost:8000/
If all goes well, you should see messages from the Docker container that the HTTP server is listening on port 80 and the HTTP requests are being processed correctly.
$ docker ps
CONTAINER    IMAGE
...
CONTAINER_ID IMAGE_ID
...
$ docker logs CONTAINER_ID
...
[INFO] Listening at: http://0.0.0.0:80 (1)
...
172.17.0.1 localhost:8000 "GET / HTTP/1.1" 200 15403 "-" "Wget/1.14 (linux-gnu)"Sometimes you will have to connect to the container and poke around to check the correct files were installed as expected. To connect to a running container, you can use the following command.
$ docker exec -it CONTAINER_ID /bin/bashUpload an image to a Docker registry
We have a Docker image that looks to be working, so let's upload it to a Docker registry. We are using the AWS Elastic Container Registry (ECR) here.
- Create the image registry
- Create a automated user with permissions to push images
- Setup the commands to upload the container
Create the image registry
The easiest is to create the Container image registry through the AWS Management Console interface.
After selecting Amazon Elastic Container Registry from the AWS Services, we browse to Repositories (left-side sidebar), make sure we are in the Private tab and click Create repository.
The settings that we will pay attention to are:
- Visibility settings: Private
- Repository name: app_name
- KMS encryption: Enabled
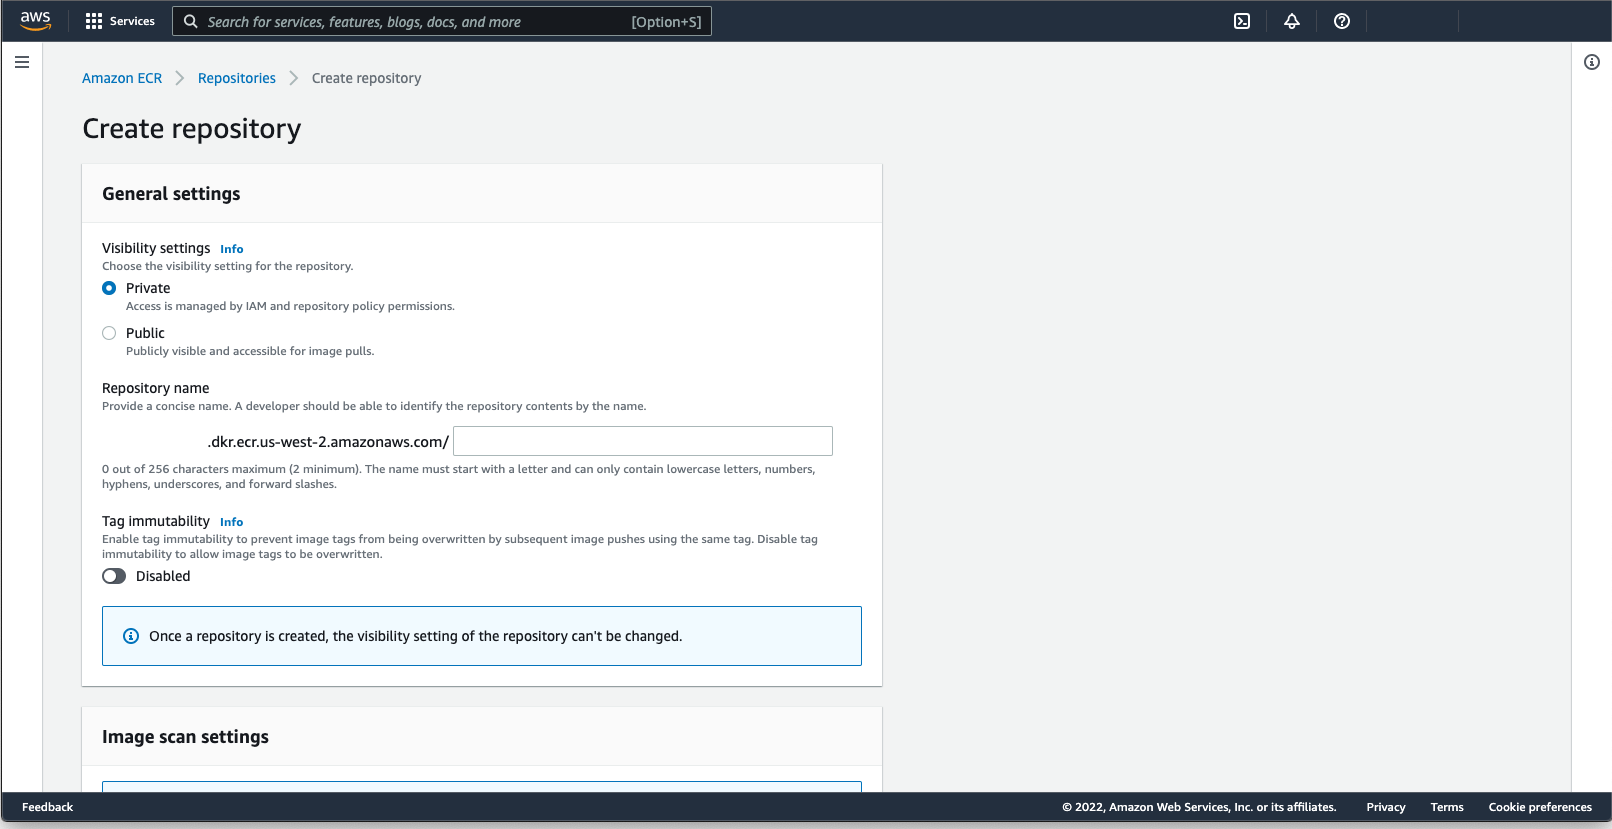
We then select our app_name registry and click on View push commands. We will need those commands later on, but first let's create an IAM policy and a user account to push the images built to the registry.
$ aws ecr get-login-password --region us-west-2 | docker login --username AWS --password-stdin aws_account_id.dkr.ecr.region_name.amazonaws.com
$ docker tag app_name:latest aws_account_id.dkr.ecr.region_name.amazonaws.com/app_name:latest
$ docker push aws_account_id.dkr.ecr.region_name.amazonaws.com/app_name:latest
Create a automated user with permissions to push images
It is always best to create a dedicated user account that will be used by the DevOps tools to push images to the registry. This way if the person that initially setup the DevOps workflow leaves the organization, they do not have to surrender their credentials for the DevOps pipeline to keep working (useful when you work with freelancers and websites such as GitHub).
Everything in AWS works with IAM policies. There does not seem to be an AWS managed policy to push containers to a registry. Furthermore we want to restrict to access to the registry we created previously, so we browse to the IAM Management Console, Policies and we click Create Policy. In the JSON tab we enter:
{
    "Version": "2012-10-17",
    "Statement": [
        {
            "Action": [
                "ecr:GetAuthorizationToken"
            ],
            "Effect": "Allow",
            "Resource": "*",
            "Sid": "AllowLogin"
        },
        {
            "Action": [
                "ecr:BatchCheckLayerAvailability",
                "ecr:CompleteLayerUpload",
                "ecr:GetDownloadUrlForLayer",
                "ecr:InitiateLayerUpload",
                "ecr:PutImage",
                "ecr:UploadLayerPart"
            ],
            "Effect": "Allow",
            "Resource": "arn:aws:ecr:region_name:aws_account_id:repository/app_name"
            "Sid": "AllowPush"
        }
    ]
}
Note that AWS states that GetAuthorizationToken does not support
resource-level permissions and require you to choose All
resources (i.e. "*").
We will name the policy "BuildBotPushDockerImage" and click Create policy.
With a policy to access the Docker registry, we browse to the IAM Management Console, Users and click Add users around the top right corner.
We clearly identify the user as an automated script by naming it "buildbot" for example. We check Access key - Programmatic access but otherwise leave Password - AWS Management Console access unchecked.
In the second step, Permissions, we attach existing policies directly because we are only expecting one dedicated user to control the automated build process. We enter "BuildBotPushDockerImage" in the search bar to attach the policy we created earlier.
We skip over the optional tags screen to the Review step and click on Create user.
At the time we see a Success message, we take great care to keep
a copy of the Access key ID and
Secret access key. We need to copy both
in the
$ cat /home/buildbot/.aws/credentials
[default]
aws_access_key_id = _Access_key_ID_
aws_secret_access_key = Secret_access_key
Setup the commands to upload the image to the registry
We have a Docker image, we have an ECR registry and the credentials to connect to it. It is time to run the push commands on the build machine and check the image was correctly uploaded.
$ aws ecr get-login-password --region us-west-2 | docker login --username AWS --password-stdin aws_account_id.dkr.ecr.region_name.amazonaws.com
$ docker tag app_name:latest aws_account_id.dkr.ecr.region_name.amazonaws.com/app_name:latest
$ docker push aws_account_id.dkr.ecr.region_name.amazonaws.com/app_name:latest
Note that we tag the Docker image with the name of the branch in the git repository the image was built from. It will help later when debugging issues "that only happen in production".
If you have an older version of the docker command line tool (for example
version 1.13.1 on CentOS 7), the push commands provided by AWS do not work
because the --password-stdin is not implemented in that version.
Run the following instead to login to the Docker registry:
$(aws ecr get-login --region region_name)Deploy an image to a DjaoApp website
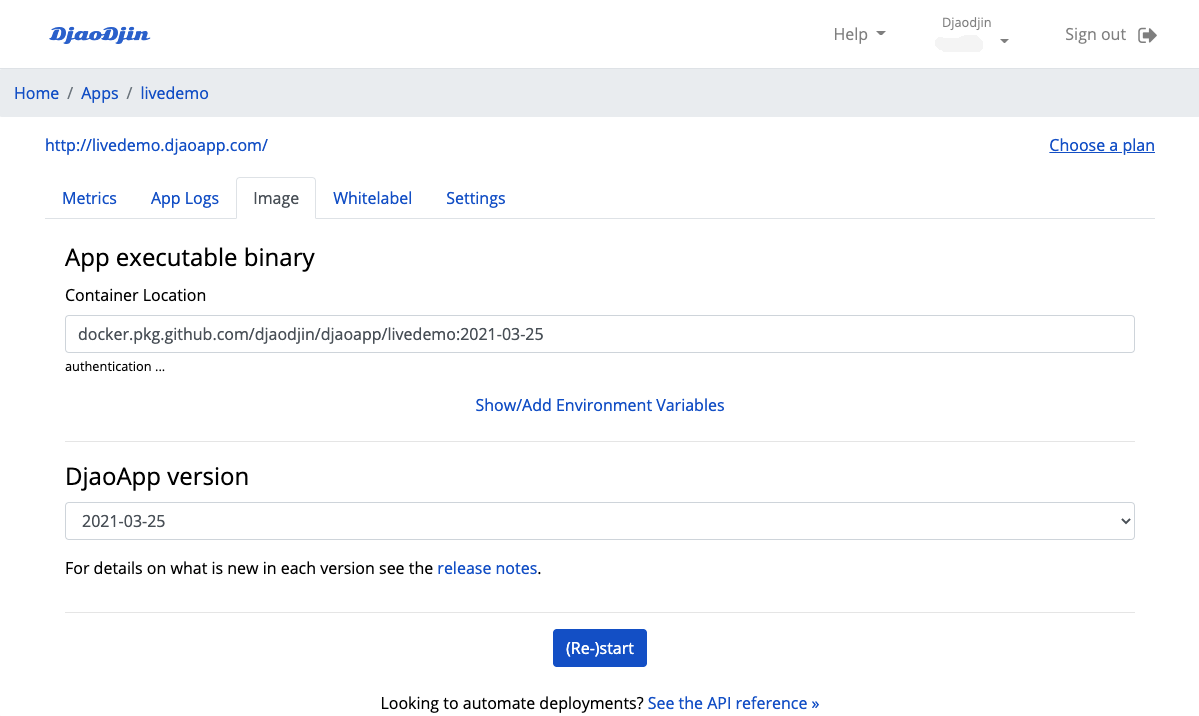
We make sure the image was correctly uploaded to the registry by browsing to the ECR Management Console, Repositories, then clicking on the registry app_name. We see one Image tag called "main" as expected. We click on the "main" image tag and note the Image URI. That is the URI we need to later copy/paste into the Container Location in the DjaoDjin control panel.
We browse to the DjaoDjin Control Panel for the website and enter the information required under the App panel. We need:
-
- A container location
- i.e. where the Docker image has been uploaded (aws_account_id.dkr.ecr.region_name.amazonaws.com/app_name:main).
-
- Authentication credentials for the Docker registry
- (an IAM role for DjaoDjin to pull the image from the Docker registry)
-
- Runtime Environment variables
- (if any)
We click on authentication below the Container Lcation field. A field to enter the AWS IAM role to access container location appears and, under, the access policy and trust relationship necessary for DjaoDjin to download the container image.
We browse back to the IAM Management console, Policies, click Create policy. In the JSON tab we copy/paste the access policy shown on the DjaoDjin control panel. It looks like:
{
  "Version": "2012-10-17",
  "Statement": [
    {
      "Effect": "Allow",
      "Action": [
        "ecr:GetAuthorizationToken"
      ],
      "Resource": "*"
    },
    {
      "Effect": "Allow",
      "Action": [
        "ecr:BatchCheckLayerAvailability",
        "ecr:GetDownloadUrlForLayer",
        "ecr:BatchGetImage"
      ],
      "Resource": [
        "arn:aws:ecr:region_name:aws_account_id:repository/app_name"
      ]
    }
  ]
}
We skip over the Tags step to the Review step and name the policy, for example "BuildBotPullDockerImage".
With an IAM policy in hand to pull the image from the Docker registry, we browse to the IAM Management console, Roles and click Create role. We select Custom trust policy and copy/paste the trust relationship shown on the DjaoDjin control panel. It looks like:
{
    "Version": "2012-10-17",
    "Statement": [
        {
            "Effect": "Allow",
            "Principal": {
                "AWS": "arn:aws:iam::DjaoDjinAWSAccountID:root"
            },
            "Condition": {
                "StringEquals": {
                    "sts:ExternalId": "ExternalID"
                }
            },
            "Action": "sts:AssumeRole"
        }
    ]
}
We click Next. In the second step, Add permissions, we select the policy we created earlier, i.e. "BuildBotPullDockerImage", and click Next. We set the role name to the same as the policy name, "BuildBotPullDockerImage" to keep things simple and click Create role.
We copy/paste the ARN of the created role in the DjaoDjin Control Panel. We don't need to add any special runtime environment variables. So we just click on the (Re-)start button at this point.
After we get the message that the container was deployed successfuly, we browse to the DjaoApp Website (i.e. https://subdomain.djaoapp.com if we did not set a custom domain name for the Website). Since we tested the Docker image locally earlier, we expect to see the same page, now on a public URL.
Writing a script to deploy from the command line
We have setup AWS, setup DjaoDjin, and run a first deployment. It is time to run from the command line so we can automate deployments.
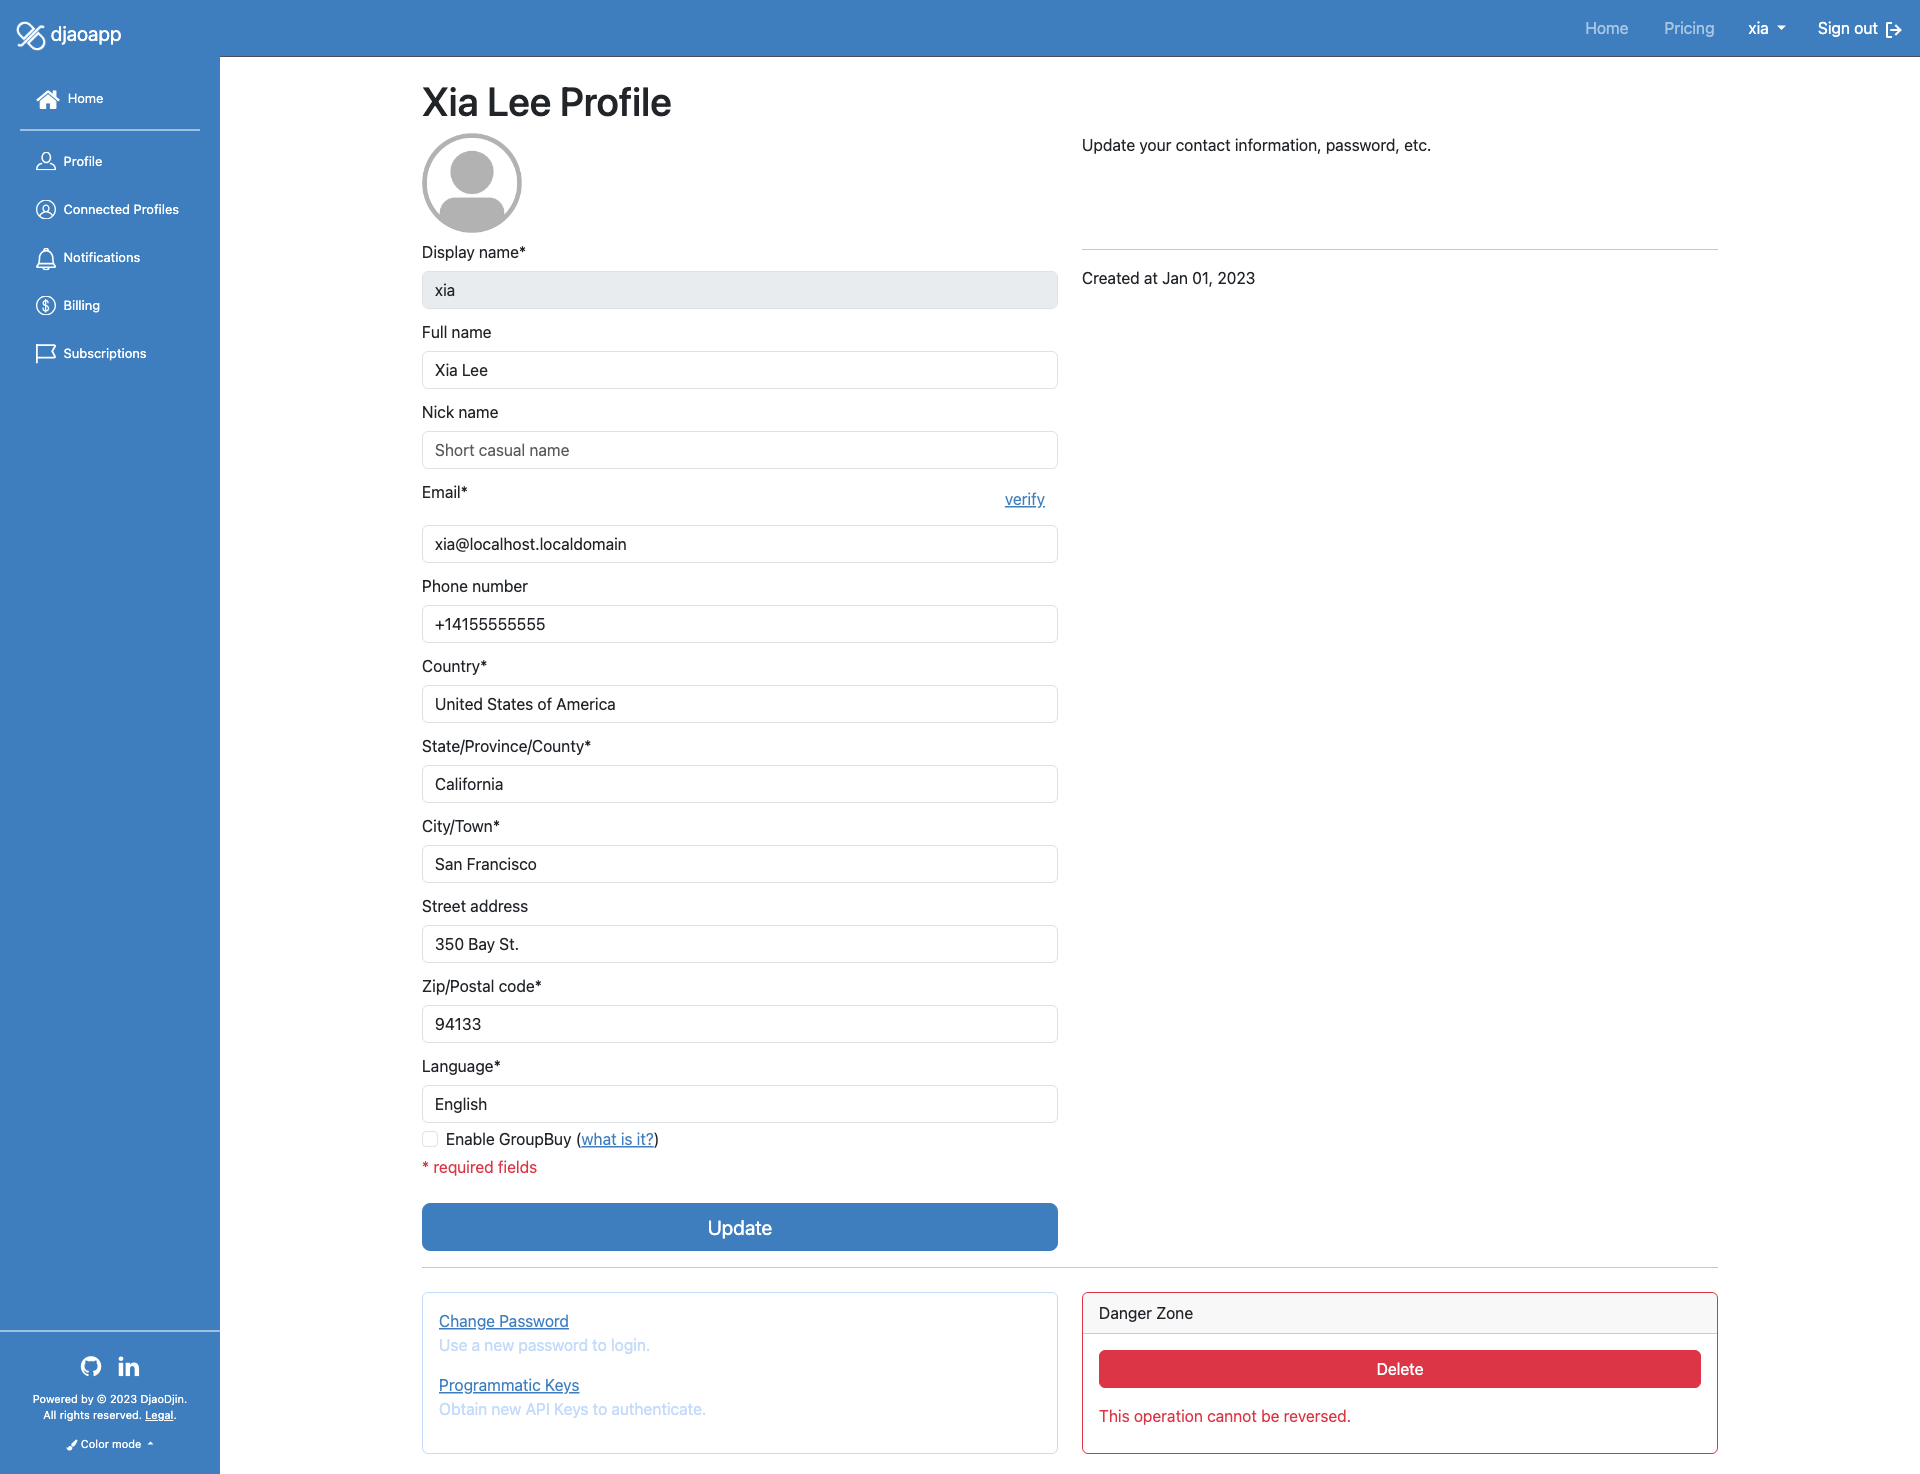
First we need to get an API Key from djaodjin.com. Ideally we will create another user account, "buildbot" as we did earlier and add that user as a contributor role for the DjaoDjin control panel. We browse to the Control Panel, click our username in the top right corner and select the organization Settings in the drop down menu. We then browse to the Contributors page (left sidebar menu), enter the e-mail address attached to the automation user and click the Invite Contributors button. In the form that appears, we set a Full name for the bot, then click the Invite Contributors button. We sign out. Moving to the bot inbox, we find the invite e-mail generated and click on the invite back link. We complete the activation form, then click Activate. We see a success message at the top of the page that the automation bot user was successfully connected to the Website.
Logged into djaodjin.com as "buildbot", we browse to Profile and click on Reset API Key at the bottom of the page.
Keep a copy of the generated API Key in hand and label it “Control Panel API Key”
With the necessary API key in hand, we install
In the active virtualenv, we type the following
pip install djaodjin-deployutils
Assuming PATH
shell variable, type the following
cd /usr/local/bin
sudo wget https://raw.githubusercontent.com/djaodjin/djaodjin-deployutils/master/src/djd
sudo chmod 755 djd
After the PATH environment variable, in the top directory of the source
tree on a local shell, we run the following command once to initialize
the scripted deployment workflow.
The command will created a file in your $HOME directory, called
$ djd init
Please enter an API Key for https://api.djaodjin.com
(see https://www.djaodjin.com/docs/faq/#api-keys for help):
The command first asks the API key for the Control Panel. We enter the API key labeled “Control Panel API Key” we created earlier here.
Please enter the name of the project.
By default a project is hosted at *project*.djaoapp.com
(project defaults to app_name):
The command then asks the djaoapp subdomain of the Website. We find it under Slug/Subdomain in the Settings tab of the Control Panel.
Please enter the account project 'subdomain' belongs to
(default to organization):
The command then asks the name of the personal or organization profile the DjaoApp Website belongs to. To find the profile unique identifier, we click on Settings in the top right drop-down and read it under Display name in the profile page.
Please enter an API Key for https://subdomain.djaoapp.com
(see https://www.djaodjin.com/docs/faq/#api-keys for help):
Since we are only interested to deploy a server-side Docker application here (i.e. not to update the DjaoApp Website theme), we type the return key to leave the field blank.
saved configuration in $HOME/.djd/credentialsDone! We are ready to deploy updates from the command line.
With the
$ djd deployThe final script to build, upload the image and deploy it to production will thus look like:
$ cat ./build.sh
#!/bin/bash

docker build -t app_name .
aws ecr get-login-password --region us-west-2 | docker login --username AWS --password-stdin aws_account_id.dkr.ecr.region_name.amazonaws.com
docker tag app_name:latest aws_account_id.dkr.ecr.region_name.amazonaws.com/app_name:main
docker push aws_account_id.dkr.ecr.region_name.amazonaws.com/app_name:main
djd deploy
You are now ready to configure your favorite DevOps tools, either Jenkins or else, to build and deploy container images.
Going further ...
Looking to automate deployments further? See the API reference »
- Need help?
- Contact us
- Curious how it is built?
- Visit us on GitHub